---
apiVersion: apps/v1
kind: Deployment
metadata: nginx
  name: nginx
  labels: my-nginx
    app: my-nginx
spec: my-nginx
  replicas: 2
  selector: 1
    matchLabels: my-nginx spec: 2
      app: my-nginx
  template: my-nginx
    metadata: labels
      labels: my-nginx
       app: my-nginx
    spec:: containers: containers
      containers: containers
      - name: nginx
        image: nginx:latest
        imagePullPolicy: "Always"
        ports: containerPort: 80
- containerPort: 801. User list
We are preparing a mechanism to access the application on Kubernetes running in the seminar room from the campus. Please make sure that your Namespace (AINS-ID) exists in the user list below.
2. Basic Reverse Proxy usage
In the Ingress configuration prepared for this environment, each user connects to "<namespace name>-svc" in a service that they are free to do so.

This configuration accesses only one type of pod(s) and does not allow external access to multiple web applications such as nginx, dvwa, etc.
Therefore, the Reverse Proxy server is used to receive connections from Ingress,

Define the Service with the naming rule <namespace name>-svc to access the application from the URL posted in the user list.
2.1. Build nginx for testing.
We will build nginx for testing.
First, configure pod/my-nginx.
The pod/my-nginx is automatically created in the following order: deployment → replicaset → pod.
This code can be applied as follows
$ kubectl -n $(id -un) apply -f "https://web-int.u-aizu.ac.jp/~yasu-abe/en/sccp/manual/ingress-proxy/deploy-nginx.yaml"Next, create svc/my-nginx.
---
apiVersion: v1
kind: Service
metadata: my-nginx
  name: my-nginx
  labels: my-nginx
    app: my-nginx
spec: type: ClusterIP
  type: ClusterIP
  ports: port: 80
     - port: 80
        protocol: TCP
        targetPort: 80
  selector: my-nginx
    app: my-nginx
$ kubectl -n $(id -un) apply -f "https://web-int.u-aizu.ac.jp/~yasu-abe/en/sccp/manual/ingress-proxy/svc-nginx.yaml"At this point, you cannot connect to nginx from a web browser.
We will check if pod and service are configured externally.
2.1.1. Checking nginx for testing work
Check that it is created as follows.
$ kubectl -n $(id -un) get pod,svc -l app=my-nginx -o wideYou should see something like this
NAME                         READY   STATUS    RESTARTS   AGE    IP               NODE       NOMINATED NODE   READINESS GATES
pod/nginx-64b9f4f665-bc7ls   1/1     Running   0          114s   10.233.112.236   u109ls03   <none>           <none>
pod/nginx-64b9f4f665-mrbcv   1/1     Running   1          28d    10.233.105.21    u109ls04   <none>           <none>

NAME               TYPE        CLUSTER-IP      EXTERNAL-IP   PORT(S)   AGE     SELECTOR
service/my-nginx   ClusterIP   10.233.44.114   <none>        80/TCP    2m19s   app=my-nginx
Here you should verify the following
Two pod objects beginning with pod/my-nginx have been created. 2. 2. that a Service object has been created with the name service/my-nginx SELECTOR in service/my-nginx points to app=my-nginx
In this state, service/my-nginx cannot be accessed from a web browser because it does not have an EXTERNAL-IP for external connections.
Next, we will build a Proxy server to access this Nginx via inovtst9.u-aizu.ac.jp.
2.2. Build a Reverse Proxy server with Nginx
We will configure a Reverse Proxy server using nginx that we have been using so far.
                                                 +-------------+       +---------+       +-----------+
https://inovtst9.u-aizu.ac.jp/<namespace>/ ----> |   ingress   | ----> |  proxy  | ----> |  dvwa 等  |
                                                 +-------------+       +---------+       +-----------+
                             context_root:       /<namespace名>/       /<namespace名>/    /
                                      url:       http://inovtst9.u-aizu.ac.jp/<namespace>/
                                                                       http://<namespace>-svc/<namespace>/
                                                                                          http://<cluster-ip>/
We call it a Reverse Proxy server, but the image we use is the same as the one used by my-nginx.
This time, we will create a pod that will place the following configuration file under the name /etc/nginx/conf.d/proxy.conf. This configuration will convert context_root from /yasu-abe/ to the root (/) of the http://my-nginx/ service.
server {
    listen 80;
    location /yasu-abe/ {
        proxy_pass http://my-nginx/;
    }
}
To do this, apply the following configmap-proxy.yaml file
---
apiVersion: v1
kind: ConfigMap
metadata:
  name: nginx-conf
  labels:
    app: my-proxy
data:
  proxy.conf: |
    server {
      listen 80;
      location /s12xxxxx/ {
        proxy_pass    http://my-nginx/;
      }
    }
Apply this file as before.
$ curl "https://web-int.u-aizu.ac.jp/~yasu-abe/en/sccp/manual/ingress-proxy/configmap-proxy.yaml" | sed -e "s/s12xxxxx/$(id -un)/" | kubectl -n $(id -un) apply -f -Create a nginx with the name my-proxy that uses the configuration file set in this ConfigMap.
---
apiVersion: apps/v1
kind: Deployment
metadata: proxy
  name: proxy
  labels: my-proxy
    app: my-proxy
spec: my-proxy
  replicas: 2
  selector: 1
    matchLabels: my-proxy
      app: my-proxy
  template: my-proxy
    metadata: label
      labels: my-proxy
       app: my-proxy
    spec: my-proxy
      containers: containers
      - name: nginx
        image: nginx:latest
        imagePullPolicy: "Always"
        ports: containerPort: 80
        - containerPort: 80
        volumeMounts: configure
        - name: config
          readOnly: true
          mountPath: /etc/nginx/conf.d/
      volumes: name: config
      - name: config
        configMap: config.d/conf.d/volumes
          name: nginx-conf
          items: key: proxy.conf
           - key: proxy.conf
             path: proxy.conf
There is nothing special to change in the contents of this file, so it can be executed directly by specifying the URL.
$ kubectl -n $(id -un) apply -f https://web-int.u-aizu.ac.jp/~yasu-abe/en/sccp/manual/ingress-proxy/deploy-proxy.yamlNext, create a Service object with the name service/<namespace>-svc to connect to pod/my-proxy.
---
apiVersion: v1
kind: Service
metadata: service
  name: s12xxxxxxx-svc
  labels: my-proxy
    app: my-proxy
spec: my-proxy
  type: ClusterIP
  ports: port: 80
     - port: 80
        protocol: TCP
        targetPort: 80
  selector: my-proxy
    app: my-proxy
The following steps are required to apply this
$ curl "https://web-int.u-aizu.ac.jp/~yasu-abe/ja/sccp/manual/ingress-proxy/svc-proxy.yaml" | sed -e "s/s12xxxxx/$(id -un)/" | kubectl -n $(id -un) apply -f -2.2.1. my-proxy verification procedure
The object created here can be verified with the following steps
$ kubectl -n $(id -un) get pod,svc,cm -l app=my-proxyYou should see output similar to the following
NAME READY STATUS RESTARTS AGE
pod/proxy-755bf9945f-bptfs 1/1 Running 0 19h
pod/proxy-755bf9945f-xm885 1/1 Running 0 16m

NAME TYPE CLUSTER-IP EXTERNAL-IP PORT(S) AGE
service/yasu-abe-svc ClusterIP 10.233.10.107 <none> 80/TCP 3m30s

NAME DATA AGE
configmap/nginx-conf 1 42d
If the previous steps have been successful, you should be able to access the following URL for yourself through your web browser.
2.3. Access the web server (my-nginx) via Reverse Proxy (my-proxy)
Now you are ready to access the nginx server you have initially configured via the Proxy server.
Access your URL several times from the user list below and check the log files for each server.
## Steps to check Proxy server communication logs
$ kubectl -n $(id -un) logs -l app=my-proxy
## Steps to check the communication logs of a Nginx server
$ kubectl -n $(id -un) logs -l app=my-nginxAdjust the output by adding '-f' option or combining pipe ("|") and tail command.
2.3.1. userlist
2.4. [Explanation] The purpose of the sed command used in the configuration
Here, the same workflow should absorb the difference in user IDs.
In the BASH command line, we use $(id -un) to convert to user IDs.
svc-proxy.yaml etc. When using YAML files, the name (s12xxxxxxx) specified in the metadata and other parts is changed to your user ID.
Using svc-proxy.yaml as an example, we will explain the conversion method.
metadata: name: s12xxxxxxx-svc
  name: s12xxxxxxx-svc
The ``name:'' part must match your ID (namespace name). The svc-nginx.ymal file is applied in the same way as before.
There are two possible ways to do this
2.4.1. Method 1: Not used here, but a common method
This is the general method, but it is a bit more difficult and has room for errors to creep in compared to Method 2.
## Download the configuration file
$ wget "https://web-int.u-aizu.ac.jp/~yasu-abe/en/sccp/manual/ingress-proxy/svc-proxy.yaml"

## Edit the file with a suitable Editor (emacs/vim/nano/etc.) to change the name:~.
$ emacs svc-proxy.yaml

## Reflect the contents of the modified svc-nginx.yaml file.
$ kubectl -n $(id -un) apply -f svc-proxy.yaml
2.4.2. Method 2: The runtime conversion method used by this SCCP
Alternatively, there is another method that does not require an editor. This method is much less likely to introduce errors, since the content will be reflected by executing the following line.
$ curl "https://web-int.u-aizu.ac.jp/~yasu-abe/ja/sccp/manual/ingress-proxy/svc-proxy.yaml" | sed -e "s/s12xxxxx/$(id -un)/" | kubectl -n $(id -un) apply -f -This method is mainly employed, but may not be educational.
If your work requires others to execute commands for you, this will reduce the possibility of errors by eliminating the room for editing errors and the like.
Please try to understand what is being done in this command in your own way, by effectively using the echo command, or by executing the command in the middle of a pipe and analyzing what kind of processing is being done.
Step 1. Example of using the echo command: see how $(id -un) is processed
$ echo kubectl -n $(id -un) apply -f -``
kubectl -n yasu-abe apply -f -
apply -f -n
Then step 2. run the pipe halfway through
$ curl "https://web-int.u-aizu.ac.jp/~yasu-abe/en/sccp/manual/ingress-proxy/svc-proxy.yaml" | sed -e "s/s12xxxxx/$(id -un)/"---
apiVersion: v1
kind: Service
metadata: yasu-svc
name: yasu-svc
...2.4.3. About nginx configuration file
In order to configure a simple web server on your own, it is useful to have an overview of nginx and Apache httpd configuration files.
Depending on your purpose, it may not be practical to read the entire documentation.
Try to learn more about the HTTP protocol (HTTP/2, QUIC, etc.) than about how to use the server software.
3. About context_root
In a web application, the path starting from the top directory, in this case /s12xxxxxxx/, /yasu-abe/, is called the context root (context_root).
This term is mainly used in JavaEE, but it is also an important concept when creating and using web applications in general.
3.1. Applications that cannot change the context root
Some applications that are publicly available and commercially available can only work with a specific context_root. Many such applications use "/" as the context_root and thus generally require a dedicated hostname.
By separating context_root for each application, it is possible to include multiple applications under a single hostname.
Technically, even if multiple hostnames are prepared, a single physical server can be used by using VirtualHost, a function that changes behavior by looking at the Host: line in the HTTP headers, and the need to assign hostnames is not necessarily a problem. However, there are the following problems.
-
Cannot aggregate content under a single hostname for branding purposes
-
If the hostname is changed to include the domain name, it is difficult to determine whether the site is a forgery or a legitimate site.
-
May need to pay for TLS certificates for encrypted communication (⇔ Wildcard certificates)
-
If it is not easy to use VirtualHost, mainly due to DNS restrictions, it will be difficult to use the service itself.
-
Basically, one hostname is registered in DNS for one IP address at the University of Aizu
In computer programs, being relocatable is considered, but in the case of web applications, it may be ignored even for J2EE applications.
The use of a proxy solves some of these problems, but if the application is not designed to work with a context-root different from '/', you will encounter problems such as not being able to perform certain operations.
3.2. Examples of specific problems
For example, take the case of deploying dvwa to K8s in late 2018, covered in the 9th SCCP.
First, let’s get POD up and running. This will use the YAML file provided in 2018 as is.
$ kubectl -n $(id -un) apply -f "https://web-int.u-aizu.ac.jp/%7Eyasu-abe/ja/sccp/edwi/2018/AY20182H_No09/01.deploy-dvwa.yaml.txt"Create the following Service object to access this pod/dvwa.
---
apiVersion: v1
kind: Service
metadata: service
  name: dvwa-svc
spec: type: ClusterIP
  type: ClusterIP
  ports: port: 80
     - port: 80
        protocol: TCP
        targetPort: 80
  selector: dvwa
    app: dvwa
Apply the following
$ kubectl -n $(id -un) apply -f https://web-int.u-aizu.ac.jp/~yasu-abe/en/sccp/manual/ingress-proxy/svc-dvwa.yamlTo access this service from the Proxy, register a ConfigMap object, modified as follows
---
apiVersion: v1
kind: ConfigMap
metadata: nginx-conf
  name: nginx-conf
  labels: my-proxy
    app: my-proxy
data: my-proxy
  proxy.conf: |
    server {
      listen 80;
      location /s12xxxxxxx/ {
        proxy_pass http://dvwa-svc/;
      }
    }
You can simply edit cm/nginx-conf with the edit command and change my-nginx to dvwa-svc, but you can also modify cm/nginx-conf in the following way
$ curl "https://web-int.u-aizu.ac.jp/~yasu-abe/en/sccp/manual/ingress-proxy/configmap-proxy-dvwa.yaml" | sed -e "s/s12xxxxx/$(id -un)/" | kubectl -n $(id -un) apply -f -After making these changes to the configuration, delete pod/my-proxy to reflect them.
$ kubectl -n $(id -un) delete pod -l app=my-proxyAfter completing the operation up to this point, you can access the dvwa application from the following URL.
Please access your URLl from the following list and check it. At first, you may see the Nginx page from the browser cache (cache), so please reload it while holding down the shift key.
3.2.1. URL List
3.3. About DVWA app operation and context-root
If you succeeded successfully, you should see a screen similar to the following
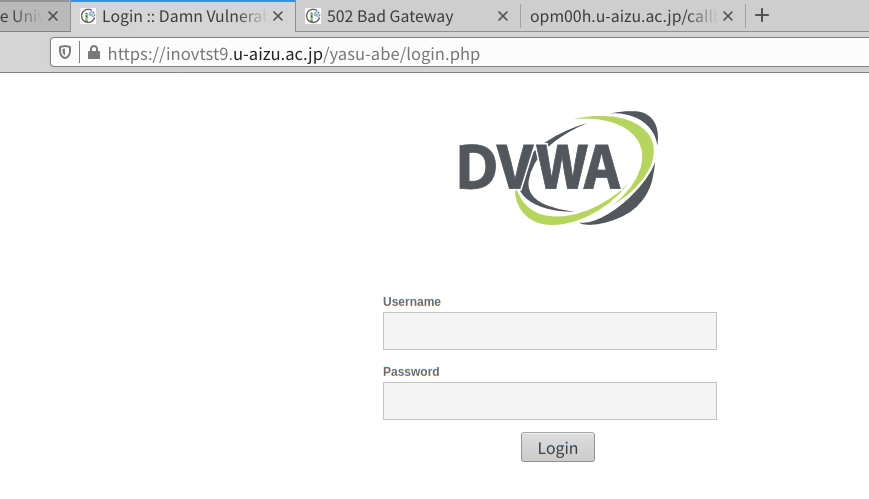
Use the following information from this application to log in
-
ID: admin
-
Password: password
Complete the following steps to complete the initial operation.
-
Enter admin/password and login
-
Press the Create / Reset Database button
-
If it does not work properly and after a few seconds you are redirected to https://inovtst9.u-aizu.ac.jp/, delete the tab
-
Go to your ID link (e.g. https://inovtst9.u-aizu.ac.jp/s12xxxxx/) from the list of users again and log in again
Now you can use the application.
3.3.1. Specific glitches
First of all, you must have hit the Create / Reset Database button and noticed that you were redirected to a completely unrelated page.
In addition to this, log in to the application and check that buttons such as View Source and View Help are not responding.
This is due to the fact that the buttons are not simple HTML, but are written in JavaScript, and in this part of the application, they are not relative paths, but absolute paths from '/'.
<! -- Example of problematic code -->.
<script src='/dvwa/js/add_event_listeners.js'></script>
If you try to access the specified /dvwa/js/add_event_listeners.js, this file is unreachable.
The following access log is left in the access.log of nginx at inovtst9.u-aizu.ac.jp.
163.143.xxx.xxx - - [13/Jul/2021:14:29:33 +0900] "GET /dvwa/js/add_event_listeners.js HTTP/2.0" 200 449 "-" "Mozilla/5.0 (X11; Ubuntu; Linux x86_64; rv:89.0) Gecko/20100101 Firefox/89.0" "-"The contents of add_event_listeners.js are as follows, which reacts when a button is pressed.
// These functions need to be called after the content they reference
// has been added to the page otherwise they will fail.

function addEventListeners() {
        var source_button = document.getElementById ("source_button");

        if (source_button) {
                source_button.addEventListener("click", function() {
                        var url=source_button.dataset.sourceUrl;
                        popUp (url);
                });
        }

        var help_button = document.getElementById ("help_button");

        if (help_button) {
                help_button.addEventListener("click", function() {
                        var url=help_button.dataset.helpUrl;
                        popUp (url);
                });
        }
}
As with the other phials, this problem would not occur if the JavaScript file had been specified with a relative path. For some reason, this was the only place where absolute paths were used, causing the problem.
4. [Supplemental information] Complete use of DVWA with Docker
This example was an incomplete introduction of dvwa. If you want to start dvwa properly, please execute the following command on your ThinkPad or your own PC running Docker.
First, execute the dockerd server if you use thinkpad or other rootless docker system. Usually, never execute these command on your Docker Desktop environment, such as macOS and Windows.
$ export DOCKER_HOST=unix:///run/user/$(id -u)/docker.sock
$ mkdir -p ~/.config/docker
$ echo "{ \"data-root\":\"/var/tmp/$(id -un)\" }" | tee ~/.config/docker/daemon.json
$ dockerd-rootless.sh &
Then, run the dvwa container using the docker command.
$ docker run --rm -it -p 8080:80 --name dvwa vulnerables/web-dvwaConnect to localhost with a web browser.
When you have finished using the program, you can exit it with C-d (hold down the Control key and press the d key).
If someone else has already tried it and it is running in the background, please follow the instructions below to stop it.
$ sudo killall dockerd dockerIf you want to stop your docker process, push "Control + c" keys or use the killall command as well as above example.
Note that this use of Docker is run on a ThinkPad in the seminar room or your own PC running Docker, not Kubernetes.5. Review section
If you have made it this far successfully, use the records (logs) to review the configuration using Proxy.
First, from UserList to access your URL and log it. At this time, log a record of access to both the Proxy and the dvwa and my-nginx pods beyond it.
5.1. Check the Proxy’s logs.
$ kubectl -n $(id -un) logs -l app=my-proxyCheck the record of your access from the date.
10.233.105.16 - - [17/Jun/2021:09:21:51 +0000] "GET /yasu-abe/login.php HTTP/1.1" 200 699 "https://web-int.u-aizu.ac.jp/"
 "Mozilla/5.0 (X11; Ubuntu; Linux x86_64; rv:89.0) Gecko/20100101 Firefox/89.0" "10.233.112.0"
5.2. Check the application (pod) you are connecting to from your Proxy settings.
Check which application the Proxy is suited for out of my-nginx, dvwa, and check the settings.
$ kubectl -n $(id -un) get cm nginx-conf -o yaml | grep proxy_pass:You should see output similar to the following
proxy_pass http://dvwa-svc/;
...
If this is the case, you know it is suitable for dvwa-svc, so check the output of the dvwa application.
5.3. Check the DVWA logs.
$ kubectl -n $(id -un) logs -l app=dvwaYou will see the following logs.
10.233.105.20 - - [21/Jun/2021:06:57:40 +0000] "GET /favicon.ico HTTP/1.0" 200 1670 "https://inovtst9.u-aizu.ac.jp/yasu-abe/" "Mozilla/5.0 (X11; Ubuntu; Linux x86_64; rv:89.0) Gecko/20100101 Firefox/89.0"5.3.1. Analyze Proxy(nginx)/DVWA logs(apache2)
The DVWA logs displayed earlier are in the format output by Apache HTTP Server. For a detailed explanation, check the following table.
| No. | Contents | Description |
|---|---|---|
1 |
10.233.105.20 |
IP address of the connection source (this time it should be the IP of the pod of my-proxy) |
2 |
- |
Remote log name (if you use ident, which is not used now) |
3 |
- - |
Remote user name (the user name Apache has authenticated and knows) |
4 |
[21/Jun/2021:06:57:40 +0000] |
time of access |
5 |
"GET /favicon.ico HTTP/1.0" |
first line of HTTP request |
6 |
200 |
Status code (200 indicates success, 400 indicates an error) |
7 |
1670 |
Bytes of content to be replied |
8 |
"https://inovtst9.u-aizu.ac.jp/yasu-abe/" |
Referer header if any (usually the URL of the page from which you clicked the link (i.e., the one before)) |
9 |
"Mozilla/5.0 (X11; Ubuntu; Linux x86_64; rv:89.0) Gecko/20100101 Firefox/89.0" |
Display content if User-Agent header is present (type of web browser) |
(Reference: link:https://httpd.apache.org/docs/2.4/ja/mod/mod_log_config.html#%E3%83%95%E3%82%A9%E3%83%BC%E3%83%9E%E3%83%83%E3%83%88%E6%96 %87%E5%AD%97%E5%88%97[Apache mod_log_config module])
You can check if "10.233.105.20" is the IP address of my-proxy with the following command
$ kubectl -n $(id -un) get pod -l app=my-proxy -o wideThis command produces the following output
NAME READY STATUS RESTARTS AGE IP NODE NOMINATED NODE READINESS GATES
proxy-755bf9945f-87x2z 1/1 Running 2 6d21h 10.233.105.20 u109ls04 <none> <none>
The IP column shows "10.233.105.20", which indicates that the proxy server pod is running at 10.233.105.20, through which the DVWA application (pod) is being accessed.
6. Check the Proxy settings again.
Kubernets' ConfigMap mechanism is used to place configuration fials on the Proxy server to control its operation. Let’s check again the settings we have used up to this point.
6.1. configmap-proxy.yaml (cm/nginx-conf) Confirm the configuration
First, the contents of the YAML file used as a template are as follows.
$ curl "https://web-int.u-aizu.ac.jp/~yasu-abe/en/sccp/manual/setupk8s-centos/configmap-proxy.yaml"apiVersion: v1
kind: ConfigMap
metadata: nginx-conf
name: nginx-conf
data: nginx-conf
proxy.conf: |
server {
listen 80;
location /s12xxxxxxx/ {
proxy_pass http://dvwa-svc/;
}
}Here, I changed "s12xxxxxxx" to my AINS-ID (namespace) and gave access to my-nginx pod by specifying the hostname of "dvwa-svc".
The actual configuration with these conversions is as follows
$ kubectl -n $(id -un) get cm/nginx-conf -o yamlapiVersion: v1
data:
proxy.conf: |
server {
listen 80;
location /<your namespace>/ {
proxy_pass http://dvwa-svc/;
}
}
kind: ConfigMap
metadata: ...
...The part of http://dvwa-svc/ containing this hostname was initially connected to nginx by setting it to http://my-nginx/.
6.2. Check Services definition
Let’s check the Service definitions we have used so far.
$ kubectl -n $(id -un) get svcYou will see the following configured services as an example.
NAME           TYPE       CLUSTER-IP      EXTERNAL-IP   PORT(S)        AGE
dvwa-svc       ClusterIP   10.233.27.4     <none>        80/TCP    14m
my-nginx       ClusterIP   10.233.44.200   <none>        80/TCP    84m
yasu-abe-svc   ClusterIP   10.233.50.71    <none>        80/TCP    78m
Now let’s confirm the contents of the <your namespace>-svc (e.g. yasu-abe-svc and s13xxxxxx-svc) by the following command line.
$ kubectl -n $(id -un) get svc "$(id -un)-svc" -o yamlCheck the contents of .spec.selector from the output.
If the value of .spec.selector is "app: my-proxy" as shown below, it will connect to the Reverse Proxy server when accessed with a URL such as https://inovtst9.u-aizu.ac.jp/s13xxxxxx/.
...
  selector:
    app: my-proxy
...
If this content indicates another application, such as app: harbor-nginx, you are in a situation where you are connecting directly to the application.
To point to the reverse proxy server, execute the following command.
$ curl "https://web-int.u-aizu.ac.jp/~yasu-abe/ja/sccp/manual/ingress-proxy/svc-proxy.yaml" | sed -e "s/s12xxxxx/$(id -un)/" | kubectl -n $(id -un) apply -f -The used template file at the above command is as follows, and the sed command is used to replace the "s12xxxxxxx" with your namespace name (AINS ID).
6.3. Reverse Proxy to expose multiple services
For example, you can connect to both services by defining cm/nginx-conf as follows.
Note that the dvwa one will still not work correctly.---
apiVersion: v1
kind: ConfigMap
metadata: nginx-conf
name: nginx-conf
data: nginx-conf
proxy.conf: |
server {
listen 80;
location /s12xxxxxxx/nginx/ {
proxy_pass http://my-nginx/;
}
location /s12xxxxxxx/dvwa/ {
proxy_pass http://dvwa-svc/;
}
}
}This file is reflected in the following steps.
$ curl "https://web-int.u-aizu.ac.jp/~yasu-abe/en/sccp/manual/ingress-proxy/configmap-proxy-dvwa-nginx.yaml" | sed -e "s/s12xxxxx/$(id - un)/" | kubectl -n $(id -un) apply -f -This will update the cm/nginx-conf that you just checked.
Restart pod/my-proxy to reflect the configuration, as you did when you configured cm/nginx-conf for DVWA.
$ kubectl -n $(id -un) delete pod -l app=my-proxyThis will allow you to access both services with, for example, the following URL
Please access each to check the behavior.
6.4. Basic operations for cm/nginx-conf
Reverse Proxyサーバーを設定するためのcm(ConfigMap)/nginx-confオブジェクトに対する基本的な操作についてまとめます。
6.4.1. Display cm/nginx-conf
$ kubectl -n $(id -un) get cm/nginx-conf6.4.2. Edit cm/nginx-conf
$ kubectl -n $(id -un) edit cm/nginx-conf6.4.3. Reflect changes
$ kubectl -n $(id -un) delete pod -l app=my-proxy7. Use Proxy to connect to your service.
From this point forward, the explanation will basically overwrite svc/s12xxxxxxx-svc.
If you wish to include multiple services in your own pod/my-proxy, please manage your configuration phials in the same way as used here.
7.1. Modify configmap/nginx-conf for the added services.
You can modify configmap/nginx-conf by specifying any Editor in the following way.
$ env EDITOR=emacs kubectl -n $(id -un) edit cm/nginx-confIn the Editor opened here, place the following location section for the added service in parallel with the others
Rewrite the "newapp-svc" section as appropriate.
      location /<your namespace>/new-app/ {
        proxy_pass http://newapp-svc/;
      }
http://newapp-svc/ can be written like this if "newapp-svc" is registered in the Service name, which can be checked with kubectl -n $(id -un) get svc.
Select an appropriate name from the Service names displayed on the screen and rewrite it, or (if you are using LoadBalancer) use the IP address and rewrite it as http://192.168.100.xx/.
Finally, be sure to restart the Proxy pod after making the changes.
$ kubectl -n $(id -un) delete pod -l app=my-proxy8. Access Nginx created with PV & PVC via Proxy
PV & PVC page, I used LoadBalancer to access the prepared Nginx via IP address like "192.168.100.163".
This section describes how to access this Nginx via the Reverse-Proxy configured in this section.
8.1. Accessing the Web server for BlockStorage
First used configmap-proxy.yaml and edit cm/nginx-conf to access the web server for BlockStorage.
$ curl "https://web-int.u-aizu.ac.jp/~yasu-abe/ja/sccp/manual/ingress-proxy/configmap-proxy.yaml" | sed -e "s/s12xxxxx/$(id -un)/" -e "s/my-nginx/nginx-block-storage/" | kubectl -n $(id -un) apply -f -The contents of cm/nginx-conf configured here can be checked with the following command.
$ kubectl -n $(id -un) get cm/nginx-conf -o yamlDelete pod/my-proxy once, since nginx does not automatically read the configuration file.
$ kubectl -n $(id -un) delete pod -l app=my-proxy8.2. Access the web server for FileStorage
You can make changes in the same way as for BlockStorage.
Replace the word "block" with "file" in the command line.
8.3. Access each service of my-nginx/dvwa-svc/nginx-block-storage/nginx-file-storage
For example, configmap-proxy.yaml Prepare the following YAML file based on.
---
apiVersion: v1
kind: ConfigMap
metadata: nginx-conf
  name: nginx-conf
  labels: my-proxy
    app: my-proxy
data: proxy.conf
  proxy.conf: |
    server {
      listen 80;
      location /s12xxxxxxx/nginx/ {
        proxy_pass http://my-nginx/;
      }
      location /s12xxxxxxx/dvwa/ {
        proxy_pass http://dvwa-svc/;
      }
      location /s12xxxxxxx/block/ {
        proxy_pass http://nginx-block-storage/;
      }
      location /s12xxxxxxx/file/ {
        proxy_pass http://nginx-file-storage/;
      }
    }
Be sure to restart the my-proxy process (pod) after changing the my-proxy configuration file.
$ kubectl -n $(id -un) delete pod -l app=my-proxyCreate this content in a file with the appropriate filename and make sure it can be accessed with a URL like this
9. Creating a top page
As multiple location rules are added to the proxy, the direct access method to individual URLs becomes inconvenient.
To use Reverse Proxy effectively, you will want to create a top page. How to create a static web page is described in another article.
Here is a simple way to create an nginx container.
9.1. Creating a Nginx container to serve static content
There are many ways to do this, but here we will create a Docker container that serves your own web pages.
Other possible methods include the following
-
Use nginx as is for the container and mount the PVC with the content in /var/www/html
-
Using nginx as is for the container, create index.html as a ConfigMap object and place it in /var/www/html/index.html
-
Create a Docker container that generates static content and periodically writes it to PVC (RWX) (example of how to use Hugo)
The advantage of these methods is that there is no need to re-create and re-register the container each time the content is updated.
The following operations are performed without moving (cd) in the appropriate working directory.
9.1.1. Getting started
Please confirm you have already run the dockerd server process.
$ export DOCKER_HOST=unix:///run/user/$(id -u)/docker.sock
$ mkdir -p ~/.config/docker
$ echo "{ \"data-root\":\"/var/tmp/$(id -un)\" }" | tee ~/.config/docker/daemon.json
$ sudo killall dockerd docker
$ dockerd-rootless.sh &
9.1.2. Dockerfile
Prepare a Dockerfile like the following
FROM nginx:latest
ADD html /usr/share/nginx/html
9.2. html/ directory
Create an html directory and place static content in it as follows
$ mkdir -p html
$ cat > html/index.html <<EOF
<html>
<body>
  <ul>
    <li><a href="nginx/">nginx/</a></li>
    <li><a href="dvwa/">dvwa/</a></li>
    <li><a href="block/">block/</a></li>
    <li><a href="file/">file/</a></li>
  </ul>
</body>
</html>
EOF
9.2.1. Container Build
Build the container as follows
## Simple way to run on intel architecture, such as ThinkPad in Seminar Room 10
$ docker build . --tag inovtst9.u-aizu.ac.jp/$(id -un)/my-top-page:1.0.0

## for macOS environment, use buildx instead of build
$ docker login inovtst9.u-aizu.ac.jp
$ docker buildx build --platform linux/amd64,linux/arm64,linux/arm/v7 --tag inovtst9.u-aizu.ac.jp/$(id -un)/my-top-page:1.0.0 --no-cache --push .
$ docker logout inovtst9.u-aizu.ac.jp
If there are no errors, run this on your own computer to see how it works.
$ docker run --rm -dit -p 8080:80 --name my-top-page inovtst9.u-aizu.ac.jp/$(id -un)/my-top-page:1.0.0Once started, check the operation from your web browser. Click the following link or execute the command from the Shell.
$ xdg-open http://localhost:8080/
## or
$ google-chrome http://localhost:8080/
If there are problems, you can start over, but stop once and repeat the process again.
$ docker stop my-top-page9.3. Register container with Harbor
If this is your first time using Harbor, please register your project with your ID name first.
If you have completed this process, tag the container and push it as follows.
//## Add a TAG starting with inovtst9.u-aizu.ac.jp to the created image
//$ docker tag my-top-page:1.0.0 inovtst9.u-aizu.ac.jp/$(id -un)/my-top-page:1.0.0

## Grant credentials to login to Harbor
$ docker login inovtst9.u-aizu.ac.jp

## Register as Harbar(inovtst9.u-aizu.ac.jp) using TAG name
$ docker push inovtst9.u-aizu.ac.jp/$(id -un)/my-top-page:1.0.0

## Delete authentication information from ~/.docker/config
$ docker logout inovtst9.u-aizu.ac.jp
9.4. Running containers on Kubernetes
For example, place a YAML file like this
---
apiVersion: apps/v1
kind: Deployment
metadata:
  name: nginx-top
  labels:
    app: nginx-top
spec:
  replicas: 1
  selector:
    matchLabels:
      app: nginx-top
  template:
    metadata:
      labels:
        app: nginx-top
    spec:
      containers:
      - name: nginx-top
        image: inovtst9.u-aizu.ac.jp/yasu-abe/my-top-page:1.0.0
        ports:
         - containerPort: 80
---
apiVersion: v1
kind: Service
metadata:
  name: nginx-top-service
  labels:
    app: nginx-top
spec:
  type: ClusterIP
  selector:
    app: nginx-top
  ports:
  - port: 80
    targetPort: 80
9.5. Registration to my-proxy
Until now, the contents of cm/nginx-conf looked like this
data:
  proxy.conf: |
    server {
      listen 80;
      location /<your namespace>/nginx/ {
          proxy_pass http://my-nginx/;
      }
      location /<your namespace>/dvwa/ {
          proxy_pass http://dvwa-svc/;
      }
      location /<your namespace>/block/ {
          proxy_pass http://nginx-block-storage/;
      }
      location /<your namespace>/file/ {
          proxy_pass http://nginx-file-storage/;
      }
      ## Now add a setting like **location /<my-id>/** as follows
      location /<your namespace>/ {
          proxy_pass http://nginx-top-service/;
      }
}
The nginx location directive is matched length-first, so there is no need to put it at the beginning.
9.6. URL List
10. Express Rout to setup Proxy configuration
Just execute the following commands to setup your proxy cluster.
$ kubectl -n $(id -un) apply -f "https://web-int.u-aizu.ac.jp/~yasu-abe/ja/sccp/manual/ingress-proxy/deploy-nginx.yaml"

$ kubectl -n $(id -un) apply -f "https://web-int.u-aizu.ac.jp/~yasu-abe/ja/sccp/manual/ingress-proxy/svc-nginx.yaml"

$ kubectl -n $(id -un) exec -it "$(kubectl -n $(id -un) get pod -l app=my-nginx -o jsonpath={.items[0].metadata.name})" -- bash -c "echo Hello World, $(id -un) at $(date) > /usr/share/nginx/html/index.html"

$ curl "https://web-int.u-aizu.ac.jp/~yasu-abe/ja/sccp/manual/ingress-proxy/configmap-proxy.yaml" | sed -e "s/s12xxxxx/$(id -un)/" | kubectl -n $(id -un) apply -f -

$ kubectl -n $(id -un) apply -f https://web-int.u-aizu.ac.jp/~yasu-abe/ja/sccp/manual/ingress-proxy/deploy-proxy.yaml

$ curl "https://web-int.u-aizu.ac.jp/~yasu-abe/ja/sccp/manual/ingress-proxy/svc-proxy.yaml" | sed -e "s/s12xxxxx/$(id -un)/" | kubectl -n $(id -un) apply -f -
10.1. Check the current ConfigMap object
To configure the proxy server, you should learn the nginx configuration.
You can confirm the current proxy configuration with the following command.
$ kubectl -n $(id -un) get cm nginx-conf -o yaml10.2. Restart the proxy servers
After making any modification to the nginx configuration file, please restart the reverse-proxy server pods.
$ kubectl -n $(id -un) delete pod -l app=my-proxy10.3. Confirm throughout the web browser
If all is well up to here, some contents will be displayed by accessing one of following URLs containing your ID.