## Change the directory name as you prefer.
$ mkdir tutorial-solr-crawler
$ cd tutorial-solr-crawler1. [docker+k8] How to build a full-text search engine using Apache Solr
The work procedure assumes ThinkPad (Ubuntu 20.04) in Seminar Room 10, but the same work can be done on Linux (CentOS) in the exercise room, macOS, and Windows 10.
- macOS environment
-
-
Java development environment (JDK 11 amd64) installed (Adoptium OpenJDK)
-
Docker Desktop for macOS installed (Official Guide)
-
- Windows 10 environment
-
-
WSL2 environment is set up (official guide)
-
Install Ubuntu 20.04 LTS from MS Store (official store)
-
Install Docker Desktop for Windows (Official Guide)
-
Java development environment (javac command) is installed in WSL2 environment (Ubuntu 20.04 LTS) (install default-jdk)
-
The Windows 10 environment uses WSL2 + Ubuntu 20.04, which is almost identical to Seminar Room 10.
2. Terminology
The Japanese and English versions of Wikipedia’s explanations do not always match; Crawler and Scraping are clearly distinct concepts, but the Japanese version of Wikipedia describes them as meaning almost the same thing.
-
Wikipedia (English) - Web Scraping
- Crawler
-
A crawler is a program that periodically retrieves documents, images, etc. from the web and automatically compiles them into a database. Crawlers are also called "bots," "spiders," or "robots. Wikipedia - Crawler
- Scraping
-
Web scraping is a computer software technique for extracting information from websites. It is also called a web crawler[1] or web spider[2]. Wikipedia - Web scraping
Scraping refers to the act of creating meaningful information from retrieved web page data; Crawler simply refers to the behavior and function of a program that compiles web page data as a database.
3. Overview of full-text search engines
To build a full-text search engine, it is necessary to retrieve the data to be searched by traversing Web pages with a crawler. In addition, database functions such as analyzing the acquired data, extracting necessary keywords, etc., and indexing the data for quick retrieval are required.
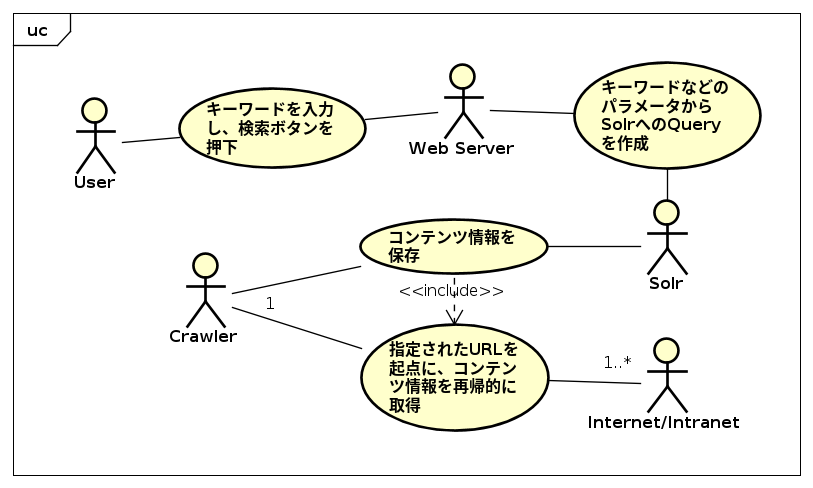
3.1. Functions required for Crawler
The following functions are required of the Crawler.
-
Ability to recursively follow links from specific URLs.
-
Ability to exclude certain links to avoid following them.
-
Function to determine whether to retrieve and store data from each web page
-
Screening function to avoid following the same Web page repeatedly
-
Load adjustment function to avoid excessive load on the Web server (setting of access intervals, etc.)
-
Support for Japanese character codes such as Shift-JIS and EUC to prevent character corruption
3.2. Functions required for databases for full-text search engines
Apache Solr used in this project has the following functions.
-
Indexing function by inverted index
-
Scoring function (weighting function by search target)
-
Highlighting (retrieving partial text and relevant portions of search results)
-
faceted search (retrieve attribute information of matched search results)
3.3. Other functions
Although not covered here, Apache Tika can be used to extract character data from Excel files, for example, which are difficult to extract textual information from as-is.
4. Overview of the work and preparatory work
To build a full-text search engine system, it is necessary to build the aforementioned crawler function and database function respectively. Although the order is reversed, we will prepare Apache Solr, which corresponds to the database function, before building the Crawler.
4.1. Preparation of working directory
Before starting work, prepare and move the working directory.
4.2. Using Apache Solr (Docker)
Apache Solr is very easy to get started with if you simply want to use it.
If you have a Docker-enabled environment, you can start it with the following command.
$ mkdir var.solr
$ chmod 2777 var.solr
$ podman run -it --rm -d -p 8983:8983 -v `pwd`/var.solr:/var/solr --name solr docker.io/library/solr:8.11
You can specify the -v option to save your configuration and saved data.
You can check the operation status in docker’s ps mode as follows.
$ podman psCONTAINER ID IMAGE COMMAND CREATED STATUS PORTS NAMES
dbf51c22bb84 docker.io/library/solr:8.11 solr-foreground About a minute ago Up About a minute ago 0.0.0.0:8983->8983/tcp solrBy connecting to port 8983 on localhost (127.0.0.1) from a web browser, Web-UI is available. http://127.0.0.1:8983/
4.2.1. Preparation of data storage area
Allocate an area to store data under the name testcore.
$ podman exec -it solr /opt/solr/bin/solr create_core -c testcoreWARNING: Using _default configset with data driven schema functionality. NOT RECOMMENDED for production use.
To turn off: bin/solr config -c testcore -p 8983 -action set-user-property -property update.autoCreat
eFields -value false
Created new core 'testcore'.If you can access the Web CLI (http://localhost:8983/solr/#/testcore/), you have succeeded.
4.2.2. Preparing data items
This time we will prepare a field named content. The following command is very long, but copy and paste everything from curl to schema, including line breaks, and execute it.
$ curl -X POST -H 'Content-type:application/json' --data-binary '{
  "add-field" : {
    "name" : "content",
    "type" : "text_ja",
    "multiValued" : "true",
    "indexed" : "true",
    "required" : "true",
    "stored" : "true"
  }
}' http://localhost:8983/solr/testcore/schema
Even without this operation, the fields are automatically created in the default configuration, so you can store information in any field. However, if you want the information to be recognized as Japanese, you must explicitly specify a type such as "text_en".
If you run the command and get output like the following, you have successfully added the content field.
{
  "responseHeader":{
    "status":0,.
    "QTime":851}}
4.3. Using Crawler (Java + crawler4j)
Crawler can be used with any programming language, but this time we will use the crawler4j library for the Java language. We have prepared the code for Japanese and other languages in advance.
$ git clone https://github.com/YasuhiroABE/crawler4j-japanese-contents.git
$ cd crawler4j-japanese-contents
$ mvn compile
If the mvn command outputs the following message at the end, it is successful.
[INFO] ------------------------------------------------------------------------
[INFO] BUILD SUCCESS
[INFO] ------------------------------------------------------------------------
[INFO] Total time: 01:12 min
[INFO] Finished at: 2021-11-29T06:58:28Z
[INFO] ------------------------------------------------------------------------
4.3.1. mvn command does not exist
If the mvn command does not exist, the following action is taken.
4.3.2. Installing mvn command under WSL2 (Windows) environment
Under WSL2 environment, type the following command
## When using the WSL2 on Windows
$ sudo apt update && sudo apt install maven
4.3.3. How to use the mvn command in other environment (e.g. macOS and Linux)
If you are on CentOS in an exercise room , use ~yasu-abe/bin/mvn. If a mvn command is not available, please download the file as follows, including macOS and WSL2.
## When using macOS
$ wget https://dlcdn.apache.org/maven/maven-3/3.9.2/binaries/apache-maven-3.9.2-bin.tar.gz
$ tar xvzf apache-maven-3.9.2-bin.tar.gz
$ export PATH=$(pwd)/apache-maven-3.9.2/bin:$PATH
4.3.3.1. Once you have installed the mvn command
Run mvn compile again.
$ mvn compile4.3.4. If compile fails
The mvn compile command may fail with the following error message
[INFO] ------------------------------------------------------------------------
[INFO] BUILD FAILURE
[INFO] ------------------------------------------------------------------------
[INFO] Total time: 12.135 s
[INFO] Finished at: 2022-06-26T21:02:53+09:00
[INFO] ------------------------------------------------------------------------
[ERROR] Failed to execute goal on project crawlerdemo: Could not resolve dependencies for project org.yasundial.crawler.app:crawlerdemo:jar:1.0- SNAPSHOT: Failed to collect dependencies at edu.uci.ics:crawler4j:jar:4.4.0 -> com.sleepycat:je:jar:5.0.84: Failed to read artifact descriptor for com.sleepycat:je:jar:5.0.84: Could not transfer artifact com.sleepycat:je:pom:5.0.84 from/to maven-default-http-blocker (http://0.0.0.0 /): Blocked mirror for repositories: [oracleReleases (http://download.oracle.com/maven, default, releases+snapshots)] -> [Help 1]
If you downloaded apache-maven yourself, edit apache-maven-3.9.2/conf/settings.xml and change the tag (-->) location and comment the entire mirrors as follows
<mirrors>
  <!--  mirror
  <mirror>
     ...
  </mirror>
  <mirror>
    <id>maven-default-http-blocker</id>
    <mirrorOf>external:http:*</mirrorOf>
    <name>Pseudo repository to mirror external repositories initially using HTTP.</name>
    <url>http://0.0.0.0/</url>
    <blocked>true</blocked>
  </mirror>
  -->
Alternatively, you can delete all contents within the mirrors tag, such as <mirrors></mirrors>
For macOS, if you installed the mvn command with brew, the settings.xml file exists in /usr/local/Cellar/maven/<version>/libexec/conf.
So far I have not experienced the same phenomenon with the mvn command in Ubuntu 20.04 LTS. If you are using WSl2, you should not have to deal with it as well if you are using Ubuntu 20.04/22.04, but in Ubuntu it is located in /etc/maven/settings. xml.
After editing the settings.xml file, please compile it again.
## Modify and compile again
$ mvn compile
4.3.5. Edit config.properties
To make sure it works, edit the file **. /config.properties file as follows If you have your own web page, specify it, etc.
Do not specify an off-campus web server so as not to inconvenience the server administrator.
## crawl target URL
TARGET_URL=https://u-aizu.ac.jp/~yasu-abe/ja/

## visit patterns escape rules:
VISIT_URL_PATTERN=^https://u-aizu.ac.jp/~yasu-abe/.+$

## crawler4j Storage Directory (You don't need to keep it on a persistent volume in k8s.)
CRAWLER4J_STORAGE_DIR=data/crawl/strage

## Pass-through rules for the shouldVisit method.
OK_FILTER=.*(\\.(text|txt|html|htm|yaml|yml|csv|json))$|.*/$
4.3.6. Run your Crawler
After editing the config.properties file, run the crawler as follows
$ mvn exec:javaIf the target web server is an external site, please check the terms of use for any restrictions on its usage.
4.4. From git clone to execution
Please confirm the flow from git clone to execution of Crawler by Asciinema .
5. Connecting from Crawler to Solr
The connection to Solr is made by modifying the Crawler program code that has just been verified to work.
5.1. Add a library for connecting to Solr
Continue to use crawler4j-japanese-contents to add the code for the Solr connection.
First, modify the pom.xml file and add the necessary library information. In parallel with the other dependicy information, add the following information
  <dependency>
      <groupId>org.apache.solr</groupId>
      <artifactId>solr-solrj</artifactId>
      <version>8.11.2</version>
    </dependency>
After making the changes, run mvn compile to make sure the changes are ok.
$ mvn compile[INFO] ------------------------------------------------------------------------
[INFO] BUILD SUCCESS
[INFO] ------------------------------------------------------------------------
[INFO] Total time: 1.192 s
[INFO] Finished at: 2021-05-16T22:33:55+09:00
[INFO] ------------------------------------------------------------------------5.2. Java code changes
Create a new file src/main/java/org/yasundial/crawler/app/MySolr.java and place the following code
Note that this code is https://kazuhira-r.hatenablog.com/entry/20150912/ 1442056103 , which is based on the following code.
package org.yasundial.crawler.app;

import java.io.IOException;
import java.util.Map;

import org.apache.solr.client.solrj.SolrClient;
import org.apache.solr.client.solrj.SolrServerException;
import org.apache.solr.client.solrj.impl.HttpSolrClient;
import org.apache.solr.common.SolrInputDocument;
import org.slf4j.Logger;
import org.slf4j.LoggerFactory;

public class MySolr {
    private static final MySolr INSTANCE = new MySolr();

    private SolrClient client;

    private MyConfig config = MyConfig.getInstance();
    private Logger logger = LoggerFactory.getLogger(getClass());

    private MySolr() {
        client = new HttpSolrClient.Builder(config.getString("MYC_SOLR_URL")).build();
    }

    public static MySolr getInstance() {
        return INSTANCE;
    }

    public void addDocument(Map<String, Object> document) {
        try {
            SolrInputDocument solrDocument = new SolrInputDocument();

            document.entrySet().forEach(entry -> solrDocument.addField(entry.getKey(), entry.getValue()));

            client.add(solrDocument);
        } catch (IOException | SolrServerException e) {
            logger.info("add Document error.", e);
        }
    }

    public void commit() {
        try {
            client.commit();
        } catch (IOException | SolrServerException e) {
            logger.info("commit error.", e);
        }
    }

    public void close() {
        try {
            client.close();
        } catch (IOException e) {
            logger.info("close error.", e);
        }
    }
}
Then change the line near the bottom of src/main/java/org/yasundial/crawler/crawler/app/MyCrawler.java as follows
        Document jsoupDoc = Jsoup.parse(html);
        System.out.println("title: " + jsoupDoc.title());
        System.out.println(" text: " + jsoupDoc.select("body").text());

        Map<String,Object> document = new LinkedHashMap<>();
        document.put("id", url);
        document.put("content", jsoupDoc.select("body").text());
        MySolr.getInstance().addDocument(document);
        MySolr.getInstance().commit();
    }
}
When you are done making changes, run
$ mvn compileThen run the new progm, but specify a URL to connect to Solr.
$ env MYC_SOLR_URL="http://localhost:8983/solr/testcore" mvn exec:javaThis MYC_SOLR_URL environment variable is used in MySolr.java, which was added earlier, as follows
    private MySolr() {
        client = new HttpSolrClient.Builder(config.getString("MYC_SOLR_URL")).build();
    }
5.3. In case that you failed to execute the "env … mvn exec:java" command
The following files can be downloaded to revise your answer.
-
pom.xml (Replace crawler4j-japanese-contents/pom.xml file)
-
MyCrawler.java (Replace the crawler4j-japanese-contents/src/main/java/org/yasundial/crawler/app/MyCrawler.java file)
-
MySolr.java (Place to crawler4j-japanese-contents/src/main/java/org/yasundial/crawler/app/MySolr.java)
After replacing these files, run the mvn exec:java with the env command.
$ env MYC_SOLR_URL="http://localhost:8983/solr/testcore" mvn exec:java5.4. Database lookup
The contents should now be registered with Solr from Crawler.
$ curl 'http://localhost:8983/solr/testcore/select?q=content%3A*%E3%83%A2%E3%83%87%E3%83%AB*'The result will look like this
{
  "responseHeader":{
    "status":0,
    "QTime":233,
    "params":{
      "q":"content:*モデル*"}},
  "response":{"numFound":1,"start":0,"numFoundExact":true,"docs":[
      {
        "id":"https://www.u-aizu.ac.jp/~yasu-abe/ja/activity/",
        "content":["YasuhiroABE プロフィール 活動概要 学内のみ Home 活動概要  .... "],
        "_version_":1699964908869779456}]
}}
Alternatively, you can check the registered documents from the Solr web console.
-
Select "testcore".
-
Go to the "Query" page
-
Click the Exec Query button

5.4.1. [Demonstration] Add a library to connect to Solr and save data to Solr until
After successfully executing mvn exec:java, make the following changes to save the data to Solr.
6. Connection from Ruby+Sinatra app
Creating a search engine with OpenAPI+Sinatra in which the following information is hard-coded for the connection.
url = URI::HTTPS.build({:host => "opm00h.u-aizu.ac.jp", :path => '/solr/api/v1/search', :query => "q=sccp&wt=json"})Change the corresponding values for this URL::HTTPS, :host and :path. In addition, :port is added. The modified code should look like this
Regarding the hostname specified for :host, if you want your Sinatra app to run in a Docker or K8s environment, specifying localhost or 127.0.0.1 will not work. From the container environment, localhost means the container itself, so you need to specify a hostname (192.168.100.25, etc.) that can be connected to from the outside, even if you want to run it on the same machine.
url = URI::HTTP.build({:host => "localhost", :port=> 8983, :path => '/solr/testcore/select',
                         :query => "q=content:#{@param_q}&wt=json&hl=on&hl.fl=content&usePhraseHighLighter=true"})
The reason the changes are so large is that the actual system does not connect directly to Solr. In any case, with this level of change, we were able to get it to connect to the application we had previously created.
6.1. Connect from the Ruby+Sinatra app
After moving to the docker-sccp-sinatra-sample/ directory where we worked before, we edit api/default_api.rb as follows, and finally check the operation with the curl command.
7. To build a full-fledged service
In this article, we have taken Apache Solr as an example of using Docker for development.
In order to actually turn this into a service like an on-campus search engine, the following points are still missing.
-
Redundancy (SolrCloud) so that Solr does not become a Single-Point-of-Failure (SPoF).
-
Add Query Parser (query analyzer) functionality to prevent Internet-Facing Server from connecting directly to the database (Solr) server
7.1. About SolrCloud
The first SolrCloud uses Kurbernetes and other tools to load-balance multiple Solr servers. The current configuration of the campus search engine is as follows.

This SolrCloud consists of two pairs of four units, and service can continue even if up to two units are stopped. Also, a single request is load-balanced across the paired shard1 and shard2, resulting in faster search speeds than with a single unit.
This configuration is similar to a RAID-10 with SSDs and HDDs.
7.2. About Query Parser
Next, we need a mechanism to parse the input search string and process it appropriately.
For simple analysis, regular expressions (regexp) may be used, but usually a parser is used.
The classical analyzer used to be a combination of a lexer and a parser, but recently, Parsing Expression Grammar (PEG) has been applied, or a DCFG (Deterministic Context-Free Grammar) -like Parser has been added to simplify processing with a single Generator. The trend is toward the use of a single generator.
Specifically, there is a growing trend away from the flex(lex)+bison(yacc) application (Generator) to the use of applications such as Ragel, AntLR, and PEG*.
As an example, we use the Parslet library, which generates PEG-style Parser for the Ruby language, to perform the analysis.
require 'parslet'

class QueryParser < Parslet::Parser
  rule(:space) { match('\s').repeat(1) }
  rule(:type1) { str('-').maybe >> match('[^"\s]').repeat(1) }
  rule(:type2) { str('-').maybe >> str('"') >> match('[^"]').repeat(1) >> str('"') }
  rule(:query) { (type1.as(:t1) | type2.as(:t1) | space).repeat(1) }
  root(:query)
end
This code has a lot of room for improvement, but I think you can get the flow of processing the input strings in order.
7.3. Implementation of an on-campus search engine
The intramural search engine, accessible at https://opm00h.u-aizu.ac.jp/solr/api/v1/search , is an Apache Solr Pod, which is connected to Apache Solr, and implements the Query Parser. However, the data returned is the return value of Apache Solr without any processing.
In order to prevent unintended information leakage, we need a function that allows only the good results to pass through that are also returned by this result. Here, such processing is not done because it is limited to the campus and also for educational purposes.
When building a service that will be widely publicized, both input and output should always be checked to ensure that only the intended information is passed through.
8. Operating a search service with K8s
Since Solr is already available as a Docker container, it is not so difficult to operate it with K8s.
From here, we will build our own search service using the Solr container provided by the official site and the Crawler container containing the Java code we improved earlier.
8.1. Running Solr on K8s
The following YAML file is reflected from the kubectl command.
To run Solr in multiple containers, a special configuration for Solr Cloud is required, so here replicas: should be set to 1.
---
apiVersion: apps/v1
kind: Deployment
metadata:
  name: solr
spec:
  replicas: 1
  selector:
    matchLabels:
      app: solr
  template:
    metadata:
      labels:
        app: solr
    spec:
      containers:
      - name: solr
        image: solr:8.11
A service object can be defined in a file like the following
---
apiVersion: v1
kind: Service
metadata:
  name: solr
  labels:
    app: solr
spec:
  type: ClusterIP
  selector:
    app: solr
  ports:
  - port: 8983
    targetPort: 8983
After applying the above two YAML files, confirm that the Solr pod is Running.
$ kubectl -n $(id -un) get pod,svc -l app=solrNAME READY STATUS RESTARTS AGE
pod/solr-75574f8fb8-gzx2m 1/1 Running 0 3m15s
NAME TYPE CLUSTER-IP EXTERNAL-IP PORT(S) AGE
service/solr ClusterIP 10.233.4.161 <none> 8983/TCP 3m3s8.1.1. Applying the above YAML files
When executing the $ kubectl -n $(id -un) get pod,svc -l app=solr command, you may see the following error message because of missing deployment and service objects.
No resources found in s13xxxxx namespace.You can fix it by executing the following commands.
$ kubectl -n $(id -un) apply -f https://web-int.u-aizu.ac.jp/~yasu-abe/ja/sccp/manual/tutorial-solr-crawler.deploy-solr.yaml
$ kubectl -n $(id -un) apply -f https://web-int.u-aizu.ac.jp/~yasu-abe/ja/sccp/manual/tutorial-solr-crawler.svc-solr.yaml
8.1.2. Example execution from YAML file download to Solr startup
8.2. Creating testcore on Solr
Since it is not possible to connect to Solr running on K8s from the outside, we will use kubectl’s exec command to get inside the pod to do the work.
$ kubectl -n $(id -un) exec -it "$(kubectl -n $(id -un) get pod -l app=solr -o jsonpath='{.items[0].metadata.name}')" -- bashNow, if the prompt changes and the command is waiting, such as solr@solr-75574f8fb8-gzx2m:/opt/solr-8.8.2$ , it is successful.
This time, do not use curl, but use the command /opt/solr/bin/solr.
... $ /opt/solr/bin/solr create_core -c testcore
... $ exit
8.2.1. Example execution of testcore creation
8.3. Deployment of Crawler container
You can register a Crawler container with Harbor yourself, but here we will use the inovtst9.u-aizu.ac.jp/library/solr-crawler:1.1.0 container.
Crawler is registered as kind: Cronjob as follows.
---
apiVersion: batch/v1
kind: CronJob
metadata:
  name: solr-crawler
spec:
  schedule: "10 9 * * *"
  concurrencyPolicy: Forbid
  startingDeadlineSeconds: 30
  successfulJobsHistoryLimit: 5
  failedJobsHistoryLimit: 5
  jobTemplate:
    spec:
      template:
        spec:
          restartPolicy: Never
          containers:
          - name: solr-crawler
            image: inovtst9.u-aizu.ac.jp/library/solr-crawler:1.1.0
            env:
            - name: LC_CTYPE
              value: ja_JP.UTF-8
            - name: TARGET_URL
              value: "https://u-aizu.ac.jp/~yasu-abe/ja/"
            - name: VISIT_URL_PATTERN
              value: "^https://u-aizu.ac.jp/~yasu-abe/.+$"
            - name: OK_FILTER
              value: ".*(\\.(text|txt|html|htm|yaml|yml|csv|json))$|.*/$"
            - name: MYC_SOLR_URL
              value: "http://solr:8983/solr/testcore"
If the schedule: line is "10 9 * * * *", it will be executed only once at 18:10. Since there is a time difference of +9 hours from Universal Standard Time (UTC), specify a time about 5 minutes after the current time.
【FYI】
You can specify for the schedule: line by the following five variables, "<minute> <hour> <day of month> <month> <day of week>"

$ man 5 crontab
...
field          allowed values
-----          --------------
minute         0–59
hour           0–23
day of month   1–31
month          1–12 (or names, see below)
day of week    0–7 (0 or 7 is Sun, or use names)
...
Set around three minutes advance of the current time.
$ wget https://web-int.u-aizu.ac.jp/~yasu-abe/ja/sccp/manual/tutorial-solr-crawler.cronjob-solr.yaml
## $ emacs tutorial-solr-crawler.cronjob-solr.yaml
$ kubectl -n $(id -un) apply -f tutorial-solr-crawler.cronjob-solr.yaml
8.3.1. [Demonstration] From downloading the YAML file of a cronjob to reflecting it in kubectl
"10 9 * * *" (18:10) is set as the execution start time, which is changed to "55 8 * * *" (17:55).
8.4. Confirmation of operation after running cronjob
After the specified time has elapsed, enter the solr container and check the documents stored in testcore as follows
$ kubectl -n $(id -un) exec -it "$(kubectl -n $(id -un) get pod -l app=solr -o jsonpath='{.items[0].metadata.name}')" -- bashNext, confirm by the prompt change that you are now in the Solr Pod as before, and use the curl command to check the data registered in Solr.
... $ curl http://127.0.0.1:8983/solr/testcore/select?q="id:*"8.4.1. Example of how a cronjob works
This is an example of execution up to entering a running Solr container and displaying the data stored in testcore.
8.5. Display search results on a web page
As explained earlier, Connect to your own Solr from docker-sccp-sinatra-sample created in Creating a search engine with OpenAPI+Sinatra .
8.5.1. Modifying sinatra-webapp
Modify api/default_api.rb in the code/ directory as follows
url = URI::HTTP.build({:host => "solr", :port => 8983, :path => '/solr/testcore/select',
    :query => "q=content:#{@param_q}&wt=json&hl=on&hl.fl=content&usePhraseHighLighter=true"})
After making the changes, build the container again and push it to Harbor.
Change DOCKER_IMAGE_VERSION at the top of the Makefile to something like 1.0.0.
DOCKER_IMAGE_VERSION = 1.0.0Run the command and repeat the process.
$ make REGISTRY_SERVER=inovtst9.u-aizu.ac.jp docker-build-prod
$ make REGISTRY_SERVER=inovtst9.u-aizu.ac.jp docker-tag

$ podman login inovtst9.u-aizu.ac.jp
$ make REGISTRY_SERVER=inovtst9.u-aizu.ac.jp docker-push
$ podman logout inovtst9.u-aizu.ac.jp
8.5.2. Example of work from changing sinatra-webapp to registering it with Harbor
8.5.3. change pod/sinatra-webapp to the uploaded version (1.0.0)
Next, we need to change the Use from Kubernentes , rewrite the 01.deploy-sinatra.yaml file and specify the image registered with Harbor this time.
If you are unsure where 01.deploy-sinatra.yaml is, you can download the file from the link above.
If you proceed in order, you should have registered your container with Harbor, so replace <your project name> below with your AINS-ID. If you have proceeded without registering a container, or if it does not work properly, please use library/sinatra-webapp:1.0.0 to isolate the problem.
image: inovtst9.u-aizu.ac.jp/<your project name>/sinatra-webapp:1.0.0Available to everyone https://inovtst9.u-aizu.ac.jp/harbor/ projects/1/repositories/sinatra-webapp container is registered and published, so if your app is not working properly, please deploy it to isolate the problem.
After reflecting the rewritten YAML file with the kubectl command, please confirm that you can access it with your own URL.
$ kubectl -n $(id -un) apply -f 01.deploy-sinatra.yaml8.5.4. A sinatra-webapp image for testing
In this case we are using a sinatra-webapp image that prepared by individuals.
There is an test container image that connects to Solr to distinguish whether there is a problem with the container or with the rest of the configuration.
$ kubectl -n $(id -un) apply -f https://web-int.u-aizu.ac.jp/~yasu-abe/ja/sccp/manual/tutorial-solr-crawler.deploy-webapp.yaml8.5.5. Another way to change the container image of a working pod
In addition to modifying the YAML file, if you want to modify the image: line of a pod that is already running, you can also directly execute the edit command as follows
$ env EDITOR=emacs kubectl -n $(id -un) edit deployment/sinatra-webappHere is an example of how it works in asciinema
If you change the settings directly, it is highly likely that you will lose track of which image you are currently working with, so editing the YAML file and applying it is recommended.
8.6. Deleting a Ccronjob
If the Crawler is still running, it may cause problems for the web site administrator, so once you have confirmed that it is running, stop the cronjob.
If you used the downloaded cronjob-solr.yaml, you can delete it using the following file.
$ kubectl -n $(id -un) delete -f cronjob-solr.yamlAlternatively, you can manually specify a cronjob object and delete it as follows
$ kubectl -n $(id -un) get cronjob
$ kubectl -n $(id -un) delete cronjob solr-crawler
9. How to create inovtst9.u-aizu.ac.jp/$(id -un)/solr-crawler
The first directory you worked on, crawler4j-japanese-contents/, does not contain any Dockerfile. If you want to create your own solr-crawler, add the necessary files as follows, and create and register a container.
9.1. JAR file
In Docker containers, there is a difficulty in using mvn compile ; mvn exec:java as is. When storing in containers, do not use mvn, but use JRE and JAR.
With mvn compile finished, the JAR file is generated as follows.
$ mvn installThis will generate target/crawlerdemo-1.0-SNAPSHOT.jar. The META-INF/MANIFEST.MF of this JAR file will contain Main-Class: org.yasundial.crawler.app.App and can be executed directly by the java -jar command.
9.2. Dockerfile
The contents of the main Dockerfile are as follows.
## deploying for production

FROM docker.io/library/eclipse-temurin:17-jre-alpine

RUN apk update && \
    apk add --no-cache tzdata bash ca-certificates

RUN mkdir /jobs
WORKDIR /jobs
COPY target/crawlerdemo-1.0-SNAPSHOT.jar /jobs/
COPY run.sh /jobs/
RUN chmod +x /jobs/run.sh

ENV TARGET_URL="https://example.com/~user01/"
ENV VISIT_URL_PATTERN="^https://example.com/~user01/.+$"
ENV CRAWLER4J_STORAGE_DIR="data/crawl/strage"
ENV OK_FILTER=".*(\\.(text|txt|html|htm|yaml|yml|csv|json))$|.*/$"
ENV MYC_SOLR_URL="http://example.com:8983/solr/test"

RUN mkdir /jobs/data
RUN addgroup crawler
RUN adduser -S -G crawler crawler
RUN chown crawler /jobs/data
RUN chgrp -R crawler /jobs
RUN chmod -R g+rwX /jobs
USER crawler

ENTRYPOINT ["./run.sh"]
9.3. run.sh
The contents of run.sh are simple.
#!/bin/bash

exec java -jar crawlerdemo-1.0-SNAPSHOT.jar
9.4. Makefile
The existing Makefile contains all essential tasks.
Modify the REISTRY_LIBRARY variable at the top of the Makefile.
9.5. Create solr-crawler container and store in Harbor
As usual, we will create a Docker container.
$ mvn package
$ make REGISTRY_SERVER=inovtst9.u-aizu.ac.jp docker-build-prod
$ make REGISTRY_SERVER=inovtst9.u-aizu.ac.jp docker-tag

$ podman login inovtst9.u-aizu.ac.jp
$ make REGISTRY_SERVER=inovtst9.u-aizu.ac.jp docker-push
$ podman logout inovtst9.u-aizu.ac.jp
From the admin screen of Harbor Make sure your project contains the solr-crawler:1.0.0 you created.
10. Summary
Solr was not accessible from a web browser via inovtst9.u-aizu.ac.jp, so there were difficulties when working remotely.
Even in real systems, when maintaining equipment on the other side of a firewall, it may be similarly difficult to access with a web browser, or you may sacrifice security by forcibly trying to access with a web browser.
Solr is completely controlled by the internal solr command and the curl command, so there is no need to set up the system without a web browser.