## Commands for checking ARP table.
$ ip neigh

## Commands to delete ARP table
$ sudo ip neigh flush all1. Summary of work
This tutorial is designed to give you a taste of two features of keepalived: load balancing and high availability (HA, High Availability).
One of the key technical elements is VRRP. VRRP allows multiple machines to share a single IP address, and even if one machine goes down, the other machines can take over the IP address and continue processing.
Keepalived is also responsible for forwarding packets. In this example, we will create an experimental network 192.168.100.0/24 and build a service to access a web server located on this network.
Next, you will also refer to the ARP table in your work.
The work will occur on a ThinkPad and on an APU/APU2 remotely logged in via ssh.
Please make sure to handle the terminal window so that there is no confusion as to which host you are logged into.

1.2. Built server
The following servers will be used for this project.
-
Web servers
There are also other web servers which are configured without load balancing for comparison.
-
Web servers (unsuitable for load balancing)
2. Keepalived by APU/APU2
APU/APU2 is a small server with x86-based CPU manufactured by PC Engines.
It is not possible to connect a display. It can be remotely logged in via SSH or other means over the network, or operated via serial communication (RS-232-C).
Please check the sticky note attached to each device for ID/password when operating via SSH. The initial password for APU/APU2 that has been initialized should be as follows.
-
ID: ubuntu
-
Password: secret
## [example] remote login to 192.168.100.210
$ ssh ubuntu@192.168.100.210
2.1. IP address and other settings of APU/APU2
I have configured eth0(enp1s0) and eth1(enp2s0) of APU/APU2 to be automatically assigned a fixed IP via DHCP server.

Use Ethernet cables for each network and connect them properly.
In general, a Linux terminal connected to the APU/APU2 with a USB serial cable can be accessed with the following command
$ sudo screen /dev/ttyUSB0 115200The IP address of each APU and the information needed to configure it are as follows
| hostname | IP address enp1s0 side | VRRP:virtual_router_id (XXX) | VRRP:auth_pass (YYY) | VRRP:virtual_ip_address | VRRP:virtual_server (tail ZZZ) | VPP:priority (WW) |
|---|---|---|---|---|---|---|
u109lb10 |
192.168.100.210 |
100 |
abc012 |
192.168.100.220/24 dev enp1s0 |
192.168.100.220 |
10 |
u109lb11 |
192.168.100.211 |
110 |
def345 |
192.168.100.221/24 dev enp1s0 |
192.168.100.221 |
10 |
u109lb12 |
192.168.100.212 |
110 |
def345 |
192.168.100.221/24 dev enp1s0 |
192.168.100.221 |
20 |
u109lb13 |
192.168.100.213 |
120 |
ghi678 |
192.168.100.223/24 dev enp1s0 |
192.168.100.223 |
10 |
u109lb14 |
192.168.100.214 |
120 |
ghi678 |
192.168.100.223/24 dev enp1s0 |
192.168.100.223 |
20 |
This information will be used later.
2.2. Information necessary to observe the operation
When the service is successfully started, the three virtual IPs will start the service, and the participating hosts and URLs for observing the operation will be as follows.
| Virtual IP address (FQDN) | Participating hosts | URL for operation check |
|---|---|---|
192.168.100.220 (u109lb20.fcsjst.u-aizu.ac.jp) |
u109lb10 |
|
192.168.100.221 (u109lb21.fcsjst.u-aizu.ac.jp) |
u109lb11 u109lb12 |
|
192.168.100.223 (u109lb23.fcsjst.u-aizu.ac.jp) |
u109lb13 u109lb14 |
The URLs listed below are also accessible for other lab work.
And the MAC addresses are as follows respectively.
| Host (IP Address) | MAC Address |
|---|---|
inovtst9 (192.168.100.1) |
02:fe:7f:19:da:f3 |
inovtst9 (192.168.100.4) |
b0:b0:00:00:00:00 |
u109lb10 (192.168.100.210) |
00:0d:b9:41:e5:40 |
u109lb11 (192.168.100.211) |
00:0d:b9:41:e0:7c |
u109lb12 (192.168.100.212) |
00:0d:b9:33:12:a4 |
u109lb13 (192.168.100.213) |
00:0d:b9:33:12:90 |
u109lb14 (192.168.100.214) |
00:0d:b9:4a:7c:40 |
- (192.168.100.150) |
b8:27:eb:b3:bb:e1 |
- (192.168.100.151) |
b8:27:eb:92:a5:e2 |
- (192.168.100.117) |
b8:27:eb:76:41:31 |
- (192.168.100.118) |
b8:27:eb:79:a0:35 |
2.3. Installation and configuration of keepalived on APU/APU2
First, make sure that you are remotely logged in to APU/APU2, and then perform the following operations.
2.3.1. Package installation
Install the keepalived package.
$ sudo apt update
$ sudo apt dist-upgrade -y
$ sudo apt install -y keepalived
If ansible is available, you can use the following commands instead.
ansible all -m apt -b -a 'update_cache=yes upgrade=dist'ansible all -m apt -b -a 'name=keepalived state=present'2.3.2. Configuration file placement and modification
Next, download the configuration file (keepalived.conf) from the following link.
Place this as a /etc/keepalived/keepalived.conf file.
In the file, replace the xxx with the text in the table above. (4 places)
Check that there are no unedited parts with the grep command or similar.
grep XXX keepalived.confgrep YYY keepalived.confgrep WW keepalived.confIf you want to create the file on the remote host, you can use the following method.
-
Download the file on the remote host using the wget command, etc.
-
use tee or cat command to copy the contents of the file.
-
Transfer the downloaded file to the local host (ThinkPad) using the scp command, etc.
If ansible is available, you can also place it with the following steps.
-
Download keepalived.conf to ~/Downloads/keepalived.conf
-
Copy keepalived.conf to the working directory that contains ansible.cfg and venv/
-
Transfer the file with the following command line
ansible all -m copy -b -a 'src=./keepalived.conf dest=/etc/keepalived/keepalived.conf owner=root group=root mode=0644'2.3.3. Start the keepalived service
After all the changes have been made, use the following commands to reflect the settings.
$ sudo systemctl restart keepalived.serviceIf ansible is available, the following command can be used.
ansible all -m systemd_service -b -a 'name=keepalived.service state=restarted enabled=true'This should start the keepalived daemon.
2.3.4. Confirmation of operation
Confirm the operation check URL from the table above, access the virtual IP allocated to you with a web browser or curl command, and confirm that it responds.
2.3.5. Try restarting APU/APU2
Restart the APU/APU2 while reloading the operation check URL using a Web browser or other means.
Confirm that the process has been taken over.
2.3.6. Try disconnecting the network cable from the web server.
Disconnect the network cable connected to the web server from the side of the switch and check that the operation changes.
2.3.7. Check using the ip neigh command
Run the following command to check the ARP table of the host
$ ip neigh-
Execute the above command and check the MAC address corresponding to the virtual IP.
-
find another IP address with the MAC address confirmed in (1.)
-
delete the ARP table from the following command, and then execute (1.) and (2.) again.
-
access the virtual IP and the Web server using a Web browser, etc., and then perform (1.) and (2.) again.
$ sudo ip neigh flush all3. How the HA cluster works in DR mode
This section explains how the service virtual IP address is passed on between the two nodes.
3.1. Check on your Client PC (ThinkPad)
The following operations should be performed on ThinkPad.
3.1.1. Check the contents of VRRP packets
First, check what kind of messages VRRP is sending on the terminal on ThinkPad as follows.
Check the device name of the NIC you are using with the ip addr command.
## Example where the NIC is defined as enp0s25
$ sudo tcpdump -i enp0s25 -n vrrp

## Example where NIC is defined with enp0s31f6
$ sudo tcpdump -i enp0s31f6 -n vrrp
You will get the following output, but since the MAC address is not included, you will not know from which APU/APU2 the communication took place.
03:34:36.650572 IP 192.168.100.210 > 224.0.0.18: VRRPv2, Advertisement, vrid 100, prio 100, authtype simple, intvl 1s, length 20
03:34:36.949668 IP 192.168.100.211 > 224.0.0.18: VRRPv2, Advertisement, vrid 110, prio 100, authtype simple, intvl 1s, length 20
Use wireshark to check which APU/APU2 the packet is originating from.
You can start wireshark as follows.
$ wireshark3.1.2. Points to check for VRRP packets
-
MAC address (mac address)
-
Virtual router ID (virtual_router_id)
-
Password (e.g., abc012)
While observing the packets, unplug the Ethernet cable from the Web server and check for any changes in behavior.
In the Wireshark, you can filter packets by mac address as follows:
MAC Address Filtering on Wireshark

3.2. Confirm operation on APU/APU
3.2.1. Check the status of virtual IP address assignment
Use the ip command on the APU/APU2 to check the assigned network (IP) address.
$ ip addrA virtual IP address is assigned to only one of the APU/APU2 in the pair.
Check the ARP table as well to see what it looks like.
4. Checking VRRP operation by Wireshark
In order to monitor packets in groups, common switching hubs are not suitable, so special hubs with features such as port mirroring, flooding mode, etc. must be prepared.
In any case, note that the overall bandwidth is limited to one port, so packets may be dropped if a large amount of data is transmitted.
The explanation is given here assuming that the packets have been monitored by Wireshark. The file used in the explanation can be downloaded from the following URL.
The downloaded file can be viewed directly in wireshark.
$ wireshark 20230126_sccp_02.pcapng.gzOnce started, specify vrrp for the filter. Be careful, it must be all lowercase. If you type it incorrectly, you will notice it because the background will turn red.

4.1. Basic VRRP operation (L2 level)
First, when keepalived is running on two nodes, packets are broadcast from the two nodes to check if you are the master node.
Then, after a while, the communication stabilizes and broadcast packets continue to be sent periodically from only one node.
Since there are several VRRP nodes in the filter, in order to see the communication of a particular group, we only show the communication whose password is "def345" as follows
vrrp and vrrp.auth_string == ghi678You will notice that the source of the packet changes from 192.168.100.214 to 192.168.100.213 along the way.

In this example, the packet is sent from 192.168.100.213 at about 3.5 seconds, and then the virtual IP is taken over.
4.2. HTTP protocol behavior (L7 level)
Check the behavior from late 21 seconds to past 25 seconds after the virtual IP has switched over.
Enter ip.addr == 192.168.100.223 in the filter to display only communications for the virtual IP 192.168.100.223.
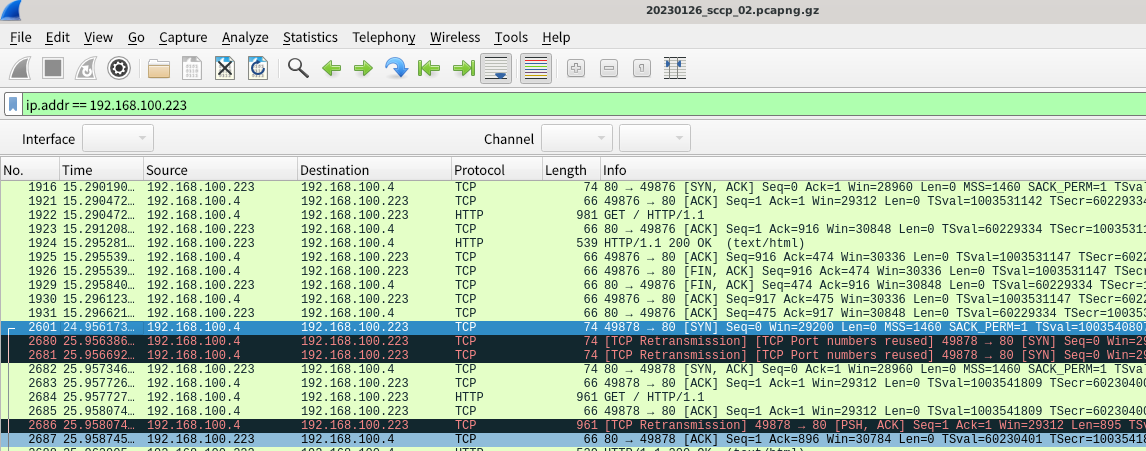
The packet is being retransmitted after a communication attempt from just before 25 seconds to just before 26 seconds failed. (black background).
4.2.1. Check the communication partners of No.2601 and No.2682
Based on the information so far, the node 192.168.100.214 may have been down when the communication of No.2601 started, and the other node that responded to the [SYN,ACK] packet in No.2682 may be a different node.
The respective indications are as follows.
The destination MAC address of No.2601 is PCEngine_4a:7c:40 (192.168.100.214).

The source MAC address for no.2682 is Raspberry_92:a5:e2 (192.168.100.151).

Next, we will check this No. 2601 communication from a different angle.
Wireshark has a TCP Stream feature that extracts only specific communications, excluding irrelevant data, so we will use this.

The communication contents of ports 49878 and 80 can now be checked.
4.2.2. Retransmitted packets for No. 2680 and No. 2681
If you check the line with black background, you can see the following information. There is no change in the IP address or the communication content at the TCP level for packets No.2601, No.2680, and No.2681.
-
In No.2680, the destination (Dst) is PCEngine_33:12:90 (192.168.100.213).
-
In No.2681, the source (Src) is PCEngine_33:12:90 (192.168.100.213) and the destination (Dst) is Raspberry_92:a5:e2 (192.168.100.151).
The 192.168.100.4 node, sensing that the original packet (No.2601) did not arrive, sends another packet with the same contents to 192.168.100.213.
Then, 192.168.100.213, which has gained a virtual IP, reacts and resends the packet so that the web server (Raspberry Pi, 192.168.100.151) receives it.
You can also see that each time it tries to initiate communication, a packet is retransmitted from the APU running the virtual IP to the web server (black background).
5. Implementation of a load balancer with Keepalived
The function of the load balancer is achieved by checking the availability of the web server on a regular basis.
Let’s see how Keepalived periodically monitors the web servers (192.168.100.150, 192.168.100.151) for dead or alive using Wireshark.
5.1. Observation of packets by Wireshark
Let’s look at the following packets from the stored or newly acquired packets.
The communication used in this example is stored in the following file.
http and ip.addr == 192.168.100.150If it is difficult to see, please use the TCP Stream function.

From this communication, we can see that there is a communication from 192.168.100.212 (APU/APU2) to 192.168.100.151 (Raspberry Pi, Web server).
The User-Agent at this time is KeepAliveClient, and periodically Keepalived communicates with the real server associated with the virtual IP.
Check the configuration file.
virtual_server 192.168.100.ZZZ 80 {
  delay_loop 1
  lb_algo rr
  lb_kind DR
  protocol TCP
  real_server 192.168.100.150 80 {
    weight 1
    inhibit_on_failure
    HTTP_GET {
      url {
        path /index.html
        status_code 200
      }
      connect_timeout 1
      nb_get_retry 1
      delay_before_retry 1
    }
  }
  ...
}
Check the operation status to real_server at one-second intervals by delay_loop 1.
5.2. When one of the web servers stops
Let’s check the behavior of 192.168.100.151 when the Ethernet cable is disconnected.
Set the wireshark filter as follows
ip.addr == 192.168.100.151
When the Ethernet cable is unplugged, communication will be one-way and there will be no replies at all with the source (Source) as 192.168.100.151.

In this example, from No.2293 to No.3740, replies with 192.168.100.151 are not confirmed.
5.3. Communication Recovery Process after Web Server Returns
At specified time intervals, Keepalived keeps checking to see if communication is possible with the real_server.
Keep Wireshark running with the Ethernet cable unplugged, and after the Ethernet cable is connected to the switch as it was, check how often communication is restored.
5.4. About HA and virtual MAC address
In Linux, it is possible to change the MAC address itself, but it is not possible to give multiple virtual MAC addresses to a single NIC.
As for virtual MAC addresses, it is possible in many cases with commercial OSs.
When using virtual MAC addresses, only the switch to which it is physically connected will know when a service node is down, and other devices on the LAN will not be affected by the operating status of the HA.
In an environment where virtual MAC addresses are not available, all devices on the LAN must know the MAC address corresponding to the virtual IP address, and must receive an ARP message informing them that the MAC address corresponding to the virtual IP address has changed due to switching service nodes. The service node switchover will result in a change in the MAC address corresponding to the virtual IP address.
6. Reference Information
6.1. Configuration items on the back-end web server side
The following settings describe what has been done on the back-end web server side in advance.
Note that it is not necessary to implement this on the APU/APU2 side.
Oracle’s documentation provides a detailed explanation.
6.1.1. Setting up a virtual IP address
The following settings are added to the /etc/network/interfaces file to recognize that the virtual IP address is the IP of the web server itself.
Only the settings for the 192.168.100.150 side are shown; the same settings are made for the 192.168.100.151 side.
## /etc/network/interfaces.d/eth0.conf
auto eth0
iface eth0 inet static
  address 192.168.100.150
  netmask 255.255.255.0
## /etc/network/interfaces.d/eth0:1.conf
auto eth0:1
iface eth0:1 inet static
address 192.168.100.220
netmask 255.255.255.0## /etc/network/interfaces.d/eth0:2.conf
auto eth0:2
iface eth0:2 inet static
address 192.168.100.221
netmask 255.255.255.0## /etc/network/interfaces.d/eth0:3.conf
auto eth0:3
iface eth0:3 inet static
address 192.168.100.223
netmask 255.255.255.0The following results of the ip addr command are caused by the settings above.
2: eth0: <BROADCAST,MULTICAST,UP,LOWER_UP> mtu 1500 qdisc pfifo_fast state UP group default qlen 1000
    link/ether b8:27:eb:b3:bb:e1 brd ff:ff:ff:ff:ff:ff
    inet 192.168.100.150/24 brd 192.168.100.255 scope global eth0
       valid_lft forever preferred_lft forever
    inet 192.168.100.220/24 brd 192.168.100.255 scope global secondary eth0:1
       valid_lft forever preferred_lft forever
    inet 192.168.100.221/24 brd 192.168.100.255 scope global secondary eth0:2
       valid_lft forever preferred_lft forever
    inet 192.168.100.223/24 brd 192.168.100.255 scope global secondary eth0:3
       valid_lft forever preferred_lft forever
If you unplug the Ethernet cable on a server and then reconnect it, the configuration that assigns this virtual IP will be reset and it will not respond to the virtual IP.
These behaviors are depends on your configuration. Please refer the above settings as it should work stably.
6.1.2. Change the setting to not respond to the virtual IP to ARP
You need to make other systems aware that it is the APU/APU2 that has the virtual IP. Change the setting so that the web server ignores the query about the virtual IP.
In the /etc/sysctl.conf file, add the following setting
net.ipv4.conf.eth0.arp_ignore=1
net.ipv4.conf.eth0.arp_announce=2
6.2. Configuration status of https://inovtst9.u-aizu.ac.jp/192.168.100.220/ etc.
The following three redirects are set as URLs for operation check.
The following configuration is made on nginx on inovtst9.u-aizu.ac.jp at the network boundary of the seminar room.
    location /192.168.100.220/ {
        proxy_pass http://192.168.100.220/;
    }
    location /192.168.100.221/ {
        proxy_pass http://192.168.100.221/;
    }
    location /192.168.100.223/ {
        proxy_pass http://192.168.100.223/;
    }
6.3. Ansible Playbook
The configuration procedures have been uploaded to the following GitHub page as an Ansible playbook project.