This document describes, in detailed steps, how to create your first project in the Nios II IDE. You will need to create a new project for each laboratory task. Parts of the first project can be re-used.
This tutorial will use:
These instructions refer to version 7.2. The procedure for version
7.1 will be very similar.
![]()
Start the Nios II IDE. You can double-click the shortcut on your desktop, or click the Start button, then All Programs, then the Altera folder, then the Nios II EDS 7.2 folder, then the Nios II 7.2 IDE shortcut. The procedure is similar for version 7.1.
Starting the Nios II IDE will take a minute or so.

The Welcome screen may appear. Close it by clicking the "Workbench" arrow in the upper right corner.
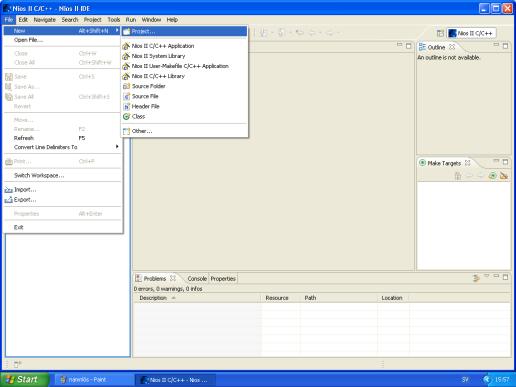
Click "File", then "New", then "Project..." to start the New Project wizard selector.

Select "Nios II C/C++ Application" and click "Next".
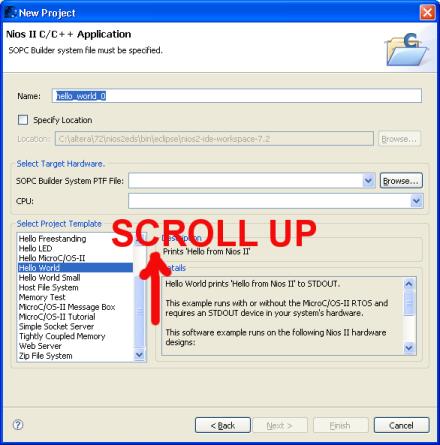
You will see the New Project dialog box. In this box, several steps must be performed.
![]()
In the Project Template selection box, scroll up and select the "Blank Project" template.
![]()
After selecting the Blank Project Template, check the box for
"Specify location".
- Nios II IDE will add your project name to the path. All projects
use different folders.

This error message appears if the path contains spaces. If you see this message, please revisit the previous step in this tutorial.
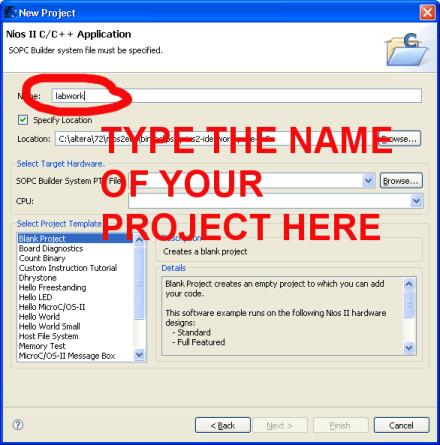
Enter a name for your project. The name must contain only letters a-z and numbers - no spaces, no special characters, and no å, ä or ö. Furthermore, the name must start with a letter.
Upper-case letters (A-Z) and lower-case letters (a-z) can both be used. However, the Windows file-system is not case-sensitive. This means that, for example, the names LabWork and labwork are considered the same by the file-system.
In this example, use the name: labwork
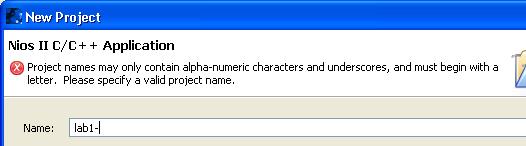
This error message appears if the project name contains an illegal character. Use only letters a-z and numbers.
First time only: download the SOPC Builder System PTF
File. The current
file version is Nios2system_20090401.ptf
- use your web browser to download the file, and save it to the right
location.
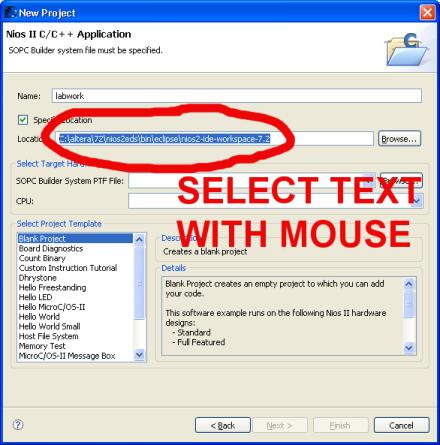
To quickly navigate to the workspace directory, you can use the following trick: use the mouse to select the project location. Copy it to the clipboard with Control-C (on your keyboard, hold down the Ctrl key and briefly press the C key).

Now click Browse.

Click in the File name box, then paste the contents of the clipboard with Control-V (on your keyboard, hold down the Ctrl key and briefly press the V key). Now click Open.
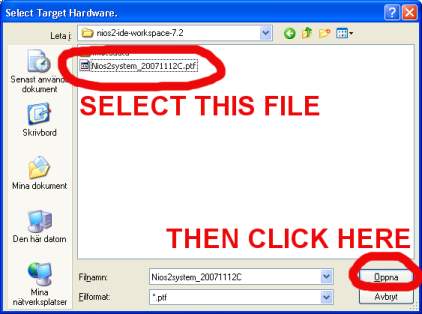
SInce the contents of the File name box is a path to a directory, Windows will open the directory. If you previously copied the PTF-file to this location, you can now select the file and click "Open".
If the PTF file is not there, you may want to download the file again.
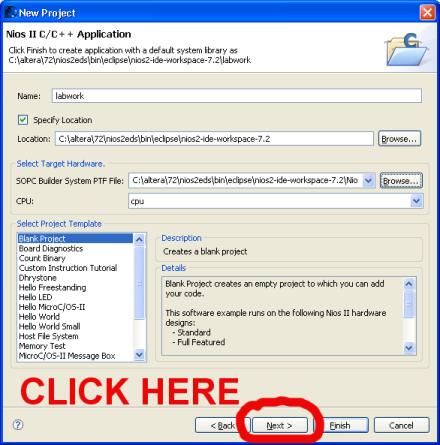
The New Project wizard dialog-box should now look like this. Click "Next".

The first time you create a Nios-II project, the next screen will look like this. You must select "Create a new system library". Then click "Finish".

Your Nios II IDE whould now look like this.
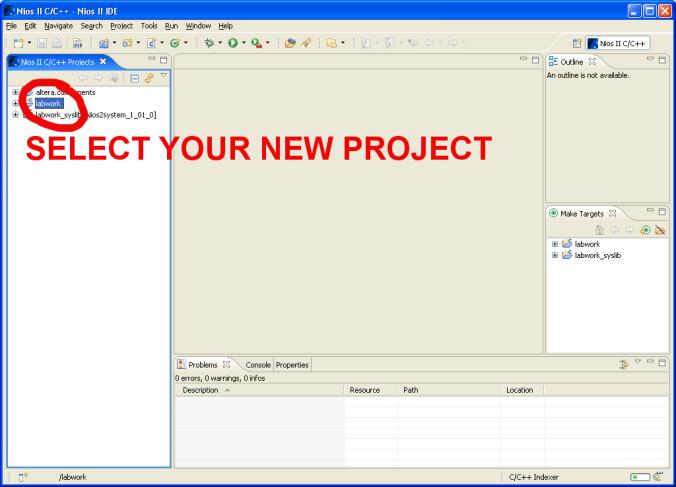
Select your new project, by clicking on the name.

Click "File", then "New", then "Source File".
![]()
You will see this dialog box.
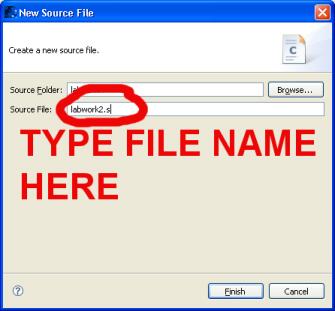
Type in the name of your source file. To create an assembly-language source file, the filename must end with ".s" - a period followed by the lower-case letter s. The name can only contain letters a-z and numbers. In this example, use the name: es_labwork2.s
Advanced: in future, you will need to create C-language source files. The name of a C source file must end with ".c".
![]()
Your Nios II IDE should now look like this.
Copy the contents of this es_labwork2.s file, and paste the contents into the file you created in the previous step.
Click once on the project name, to select the project instead of the source file.
Now, right-click the project name. In the pop-up menu, click "Run As". A fold-out menu appears; in this fold-out menu, click "Nios II Instruction Set Simulator". This will run your program in a software-simulated Nios2 processor on your own computer. Note: if you don't see the "Run As" entry, perhaps you right-clicked the assembler-file name and not the project?
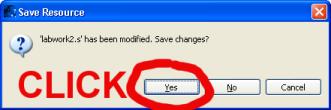
Nios II IDE will ask if you want to save your file before compiling. Click "Yes".
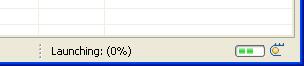
In the lower right corner if the Nios II IDE, you will see a compiler-activity indicator. Your program is being compiled. This will take several minutes on most systems.
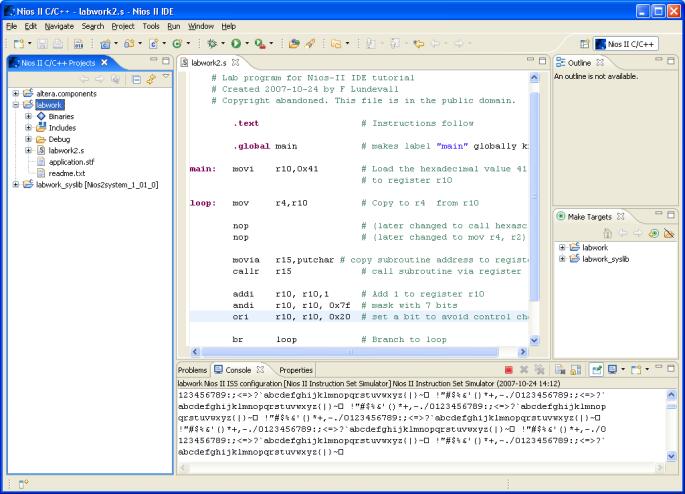
After some delay, you will see the ASCII alphabet in the Console window of the Nios II IDE. This is the output from your assembler program.
You can also use the powerful debugger, to check that your programs
execute correctly (or to investigate why they don't).